Sunday, January 31, 2010

Nightfall Cosplay Costume


One of our costume made for a lovable client and friend of ours. Nightfall from Elfquest cosplay costume revision shoots, some parts were updated by request by our client.


Cosplay1.com - The Best Costume Commission Site

Nightfall Cosplay Costume Progress Shoots


The first progress shoots of Nightfall from Elfquest cosplay costume.


Cosplay1.com - The Best Costume Commission Site

Kanon: Tsukimiya Ayu 02

kanon cosplay - tsukimiya ayu 02Energetic, spontaneous, and a bit of an airhead, Ayu tends to say "ugu" when she is frustrated, angry, or afraid. In the beginning of the series, she is trying to find something she had lost, but cannot even remember what hat it is. She enjoys eating taiyaki, a Japanese fish-shaped cake filled with red bean paste, and is seen eating the confectionary throughout the series.

Wow, I can’t believe the number of awesome cosplayers I’m getting from Winter Comiket! Thanks to everyone for sending them in! And this was sent in by Mika-Mi, who also emailed me Kagamine Rin from Vocaloid 2! Thanks for taking the time to email me!

Soy’B 2010! Photo Spammage!

Wheee! Soy’B is over before I realise!

Had to reach earlier due to my joining the Karaoke Competition, more talk about that in my next post perhaps. The day was very cursed for me. Not only did I left my home without my wallet (and thus having to waste time walking back for it) , I also forgot my extra camera batteries,SD Card and fake lashes. *palms forehead* I can’t even start describing how big a blunder that was. No wonder my make up case felt so light u_U Felt really awful without my fake lashes and had to literally cake my lids with black eyeliner and dark eyeshadows.

I’ll stop blabbering for now and go on to the photos!

30jan10_SOYB 013

Recognise them xD? They were cosplaying Shugo Chara from AFA last year!

30jan10_SOYB 008

30jan10_SOYB 015

Another Kagamine Len =)

30jan10_SOYB 017

Songster and Richard cosplaying SWAT !!!! Kudos to photographer turned cosplayers XD!!

30jan10_SOYB 023 

Yuffie from Final Fantasy 7!!

30jan10_SOYB 028

Dynasty Warrior?? A pity I didn’t managed to get any pics of her with her props/weapons. Apparently she had been holding them for a long time and was very exhaustedXD

30jan10_SOYB 027

Kuroshitsuji! Makes me feel like picking up the series sia…

30jan10_SOYB 032

omg.

30jan10_SOYB 033

MR KENTUCKY! COLONEL KENTUCKY!!!!!!

30jan10_SOYB 034

Vampire Knights!

30jan10_SOYB 037

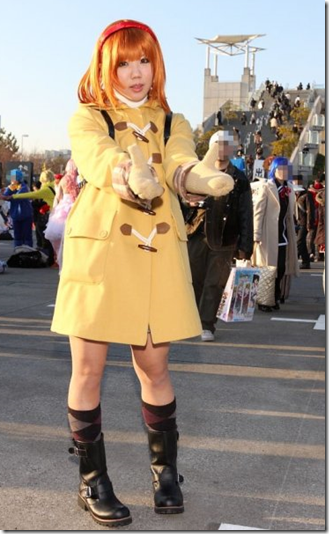
Lovely posing and expression!

If I were a man , I’d gladly go to the depths of flames and ocean for this damsel in distress xD

30jan10_SOYB 038

There’s so manyyyy vocaloids that day! Here’s a cute miku with foam leeks for you ^^

30jan10_SOYB 041 

SOS DAN!
Glad to see the fandom is still burninggggg. To the Haruhi cosplayer, thanks for following this blog too T_T!

30jan10_SOYB 045

Black rock shooter Miku and Kaito (shit can’t get the habit out)

30jan10_SOYB 046

Kuroshitsuji group!

30jan10_SOYB 048

The Convention centre had a nice moat thingy surrounding it. Some how this structure makes the place feels so un-Singapore-ish.

30jan10_SOYB 049 

Kawaii girls are kawaii :D

30jan10_SOYB 050

MOE goes extreme when the character starts brandishing knifes xD30jan10_SOYB 052

30jan10_SOYB 053

Rubya s Asuka from Evangelion ^_^

30jan10_SOYB 056

30jan10_SOYB 058

Hetalia ! Italia and Japan?

30jan10_SOYB 060

Kyubi and partner cosplayign as somethign I have no freakin idea what but…. THEY LOOK SO FREAKIN CUTE LAH AGHHHH!!! *kidnaps home*

30jan10_SOYB 064

Tenjo Tenge!

(Will pass you girls the high res soon!)

30jan10_SOYB 068

Zone 00 !
I love her sweet smile…so heart meltingly cute ;D


Alright, this marks the end of Photo Spammage Part One! Will be back with moarrrrrr. But for now, I’m off to KTV with my friends. Tata!!!!

Actual projects and a lot of expanding foam!

I'm still working on my three costumes: Aion, World of Warcraft and Bayonetta. The Armor of Aion is almost done and there are only a few armor parts missing. I'm very bad in sewing, so I dodge the parts which require seewing skills. So, here are some pictures and step by step making of's:

 
This was my ankle armor. Someone asked me for some more pictures, so I hope here you see better, how I built it.

For this knee armor I used almost the same technique, but just with a bit more single parts. One armor part consist of 54 parts! Oh, this was a long, hard job!


After covering the armor with some layers of Gesso, I started to paint it. The left picture shows my job. The right one shows the result after my boyfriend helped me. I'm very happy to have him, because he sets some nice highlights for me and redoes my work a bit. In the last years the did the entire painting job, but this year it's just too much for one person. So I do the basic painting and he sets the details. It's great to have such a good assistant!
Now, we both are almost done with our university exams, so we can start to paint together.

 
This was my basic painting job. I'm happy to be able to manage the colour gradient. Then I just have to add some simple details like the patterns on the bladed and my boyfriend have to do the rest! 

   
Here I also had to stop, because the sample is full of details. I cannot wait to see the finished work and I'm sure that he will do a great job!

Yeah, and every part here needs a paint... This will be long, hard work... (And there are some parts missing...)

 
Uhm... and I still have to finish this sword. But I have only 3 months left for this project. I'm very afraid that I will fail to get it finished in time, so I have to hurry a lot! 

Here is a little making of. You see here a lot of expanding foam. I LOVE expanding foam and it's awesome, how much you can create with it. I used just a bit of greyboard for the base and covered everything with this stuff. The last steps just consisted of a lot of carving. This step makes a lot of fun, but much more dirt, he he!
 But this was the dirt of the following project:

I've got a commision to do two gigantic hands for a commercial.
 

 He he, this was a lot of fun and it was an awesome experience to carve something of such a great size!

I also carved a lot for my World of Warcraft project:


I just have to finish the paper machè layer, polish it and can paint it afterwards. You see, expanding foam gives the chance to create every form you need!

I also started with my shoulder armor and my robe for this costume:

  
In the first steps I just cut a styrofoam ball and put some grey board parts with hot glue on it. Some soft foam stripes helped my to build the right form.
 
Then I used the same technique that I formed Journey's End antlers for the twines. I covered the top with a bit of expanding foam, carved the twines and the base out. For a solid base I added a layer of crepe tape, newspaper and papermaché. Now I just have to finish the twines and add some details. 

And my robe? It's just standing in my cosplay room. I'm happy, that I managed the hardest part of this costume for me: The seewing. And now it have to wait, until I cannot run away anymoreuuuuuuuuuuuuuuuuuuuj, he he!